In this article:
- Overview
- How to Sync Your Company
- Understanding Your Sync Limit
- Syncing a Consolidation
- Troubleshooting QuickBooks Desktop Integration and Syncing
- Error: "Recent changes require the administrator to go into the integrated application preferences and reauthorize your integrated application to log in automatically."
- Error: "Can't Open QuickBooks" or "QuickBooks Already Has A Company File Open"
- Error: File Missing
- Desktop Connector Crashes When Clicking "Locate File"
- Error: "Retrieving the COM class factory for component with CLSID..."
- Error: "QuickBooks found an error when parsing the provided XML stream."
- General Troubleshooting Tips
Overview
Syncing ensures that the financial data in Reach Reporting stays current with your accounting software. Depending on your integration type, syncing happens automatically or can be triggered manually when you need updated information.
How to Sync Your Company
QuickBooks Online, Xero, MYOB, and Gusto
These integrations sync automatically overnight if the company has not been synced within the past 18 hours. You can also manually sync at any time:
- Open your company in Reach Reporting
- Click the Sync button in the lower-left corner
- Wait for the sync to complete—this usually takes a few minutes

QuickBooks Desktop
Before syncing, you can customize what data is pulled from QuickBooks Desktop:
Settings Options:
- Customers - Enable to pull top customer data
- Vendors - Enable to pull top vendor data
- Classes/Departments - Turn on to enable class filtering in reports
- Inactive Accounts - Sync inactive accounts if your reports include historical date ranges that may reference accounts that have since been deactivated
- Accounts Receivable/Accounts Payable - Enable to sync AR/AP aging statements
- Start connector on startup - Automatically launches the Desktop Connector when your computer restarts
Note: Syncing classes, customers, and vendors significantly increases sync time depending on the number of records in your file.
To access settings:
- Open the Desktop Connector
- Click the Settings button
- Check or uncheck the options you need
- Click Save
To re-sync your QuickBooks Desktop files, use the Reach Reporting Desktop Connector:
Prerequisites:
- Desktop Connector must be installed on the computer or server where your QuickBooks Desktop files are stored
- You can download the connector by opening a Desktop company in Reach and clicking the sync icon in the lower left
Syncing Steps:
- Open the Desktop Connector and log in with your Reach credentials
- Select the companies you want to sync
- Review and adjust settings as needed
- Click Sync Files
Important Sync Rules:
- Syncing multiple companies: Close all QuickBooks Desktop files completely before syncing
- Syncing a single company: Ensure only that company file is open in single-user mode with no secondary companies open
- QuickBooks Desktop must be in single-user mode when first making the connection
- You must be logged in as an administrator when connecting for the first time
Sync Progress:
As syncing begins, you'll see progress indicators for:
- Company data
- Classes (if enabled)
- Customers and vendors (if enabled)
Syncing can take considerable time when many classes, customers, or vendors are included. If you don't need this data, deselect these options in the settings.
Remote Sync:
Remote Sync allows you to control syncing from inside Reach Reporting without accessing the Desktop Connector directly. For this to work:
- The Desktop Connector must be running on your computer or server
- You must remain logged into the Desktop Connector (logging out disables remote sync)
- When you click sync in Reach, it will sync only that specific company
After syncing completes, refresh your browser to ensure all changes are updated in Reach.
Using Right Networks / Rightworks Hosting? If your QuickBooks Desktop file is hosted on Right Networks (now Rightworks), please see our dedicated article: QuickBooks Desktop Integration (Right Networks).
CSV Companies
CSV files do not have automatic syncing. To update your data:
- Download the existing CSV file from Reach Reporting
- Add new columns or update data in your spreadsheet
- Save the file as CSV UTF-8 (Comma delimited)
- In Reach, click the Update button next to your CSV company
- Upload your revised CSV file
- You can update and re-upload as often as needed
Understanding Your Sync Limit
Your sync limit refers to the number of syncs your company can perform within a rolling 24-hour period. This limit helps ensure that your bookkeeping software remains responsive and doesn't become overwhelmed by too many sync requests.
Standard Sync Limits:
- 8 syncs per company within a rolling 24-hour window
- Each sync becomes available again exactly 24 hours after it was used
- Example: If you sync at 10:00 AM today, that sync slot becomes available again at 10:00 AM tomorrow
Xero Rate Limits:
Xero enforces strict API rate limits, which means if you sync frequently throughout the day, Xero may temporarily block additional data requests. This is most common for Xero companies that use Tracking Categories, as reports with many tracking categories require additional data requests and can hit rate limits sooner. If you hit Xero's rate limit, you'll need to wait until the next day for the limit to reset.
Need More Syncs?
If you're on a deadline and need to sync more than the standard limit, contact our support team. We may be able to temporarily increase your limit to 15 syncs per company on a case-by-case basis.
Syncing a Consolidation
When working with consolidations, it's important to understand how syncing affects your sync limit to ensure efficient data management.
Sync at the Single Company Level (Recommended):
We recommend syncing companies at the individual company level rather than syncing at the consolidation level.
Benefits of syncing individual companies:
- Preserves sync limits—only uses one sync per company
- Targeted updates—sync only the companies that need updating
- Efficient resource management—saves syncs for companies that don't need immediate updates
How Consolidation-Level Syncing Works:
When you sync at the consolidated level:
- Deducts 1 sync from every company in the consolidation
- All companies sync simultaneously, even if some don't have new data
- Can quickly deplete your available syncs if you have many companies in the consolidation
Best Practice:
Navigate to each individual company in your workspace and sync only those with updated data. The consolidation will automatically reflect the updated information from the individual companies you've synced.
Troubleshooting QuickBooks Desktop Integration and Syncing
Error: "Recent changes require the administrator to go into the integrated application preferences and reauthorize your integrated application to log in automatically."
This error indicates that the user attempting to sync doesn't have the necessary permissions to authenticate the application.
Solution:
- An admin user in QuickBooks Desktop must update permissions:
- Open QuickBooks Desktop
- Go to Edit > Preferences > Integrated Applications > Company
- Locate Reach Reporting in the list
- Update permissions for user to authenticate the application
- If permissions are correct but the error persists:
- Download and install the newest version of the Desktop Connector
- Restart QuickBooks Desktop and the Desktop Connector
- Attempt to sync again
Error: "Can't Open QuickBooks" or "QuickBooks Already Has A Company File Open"
This error appears when QuickBooks has opened multiple instances of itself and can't properly close them.
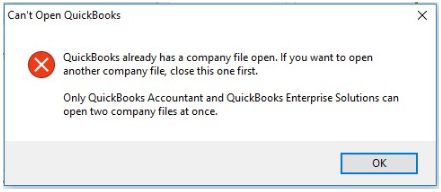
Solution:
- Close QuickBooks Desktop and the Desktop Connector
- Open your computer's Task Manager (right-click the taskbar at the bottom of your screen)
- Navigate to the Details tab
- Look for multiple instances of QBDBMgrN.exe
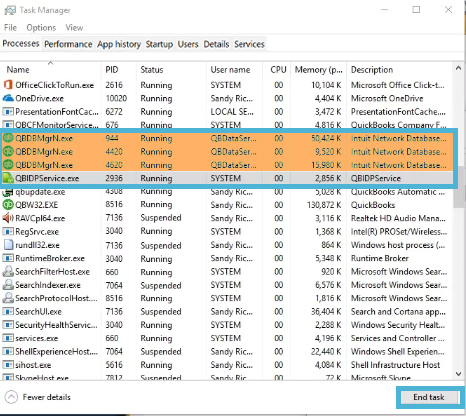
5. Select each instance and click End Task
6. Once all instances are closed, right-click on both QuickBooks Desktop and the Desktop Connector and select Run as Administrator. If prompted, click Yes in the User Account Control (UAC) popup.
7. Proceed with the connection steps
Error: File Missing
This message generally means that the QBD file has been moved or renamed on the computer or server from where it was when the connection was originally made.
Solution:
- Click on Locate File
- The link will navigate to a window where you can locate the file on your computer
Desktop Connector Crashes When Clicking "Locate File"
This typically indicates a firewall is blocking the Desktop Connector.
Solution:
- Run both QuickBooks Desktop and the Desktop Connector as Administrator:
- Right-click the application in the Start Menu
- Select Run as Administrator
- If prompted, click Yes in the User Account Control (UAC) pop-up
Error: "Retrieving the COM class factory for component with CLSID..."
Solutions (try in order):
- Uninstall and reinstall QuickBooks Desktop (often resolves this issue)
- Run QuickBooks Desktop and Desktop Connector as Administrator
- Right-click the application in the Start Menu
- Select Run as Administrator
- If prompted, click Yes in the User Account Control (UAC) pop-up
- Uninstall and reinstall the Reach Reporting Desktop Connector
- Install Intuit's QuickBooks Desktop SDK:
Error: "QuickBooks found an error when parsing the provided XML stream."
This error appears when QuickBooks has trouble reading the XML file.
Solution:
- Check to see if a firewall is enabled that is blocking the Desktop Connector
- Run QuickBooks Desktop and Desktop Connector as Administrator
- Right-click the application in the Start Menu
- Select Run as Administrator
- If prompted, click Yes in the User Account Control (UAC) pop-up
If you are still receiving the error message after trying the above solutions, please reach out to support@reachreporting.com or use the live chat feature to contact our support team.
General Troubleshooting Tips:
- Ensure QuickBooks Desktop is in single-user mode when first connecting or syncing
- Only one QuickBooks company should be open at a time during initial connection or manual sync
- Close all module windows in QuickBooks Desktop before syncing
- Verify firewall settings allow internet access for the Desktop Connector
- If syncing multiple companies, close all QuickBooks Desktop files first
- For "File Missing" errors, click Locate File to browse to where the QuickBooks file is currently saved
If you need additional help with syncing your company, please reach out to support@reachreporting.com or use the live chat feature to contact our support team.
Go to the Reach Reporting app>
ARE YOU NOT CURRENTLY USING REACH REPORTING?
learn more at reachreporting.com
We are dedicated to helping you.
- Need Additional Help?
Your success is important to us.
Whether you're working as a CFO of a business or part of an accounting firm, Reach Reporting is here to improve your working knowledge of reporting and provide service tips and skills to ensure you're at the top of your game.
We make sure that you have access to staff members who are best suited to help you. We work together to resolve issues and create memorable moments that empower you to enhance your reporting skills.
We are here to listen to you. We understand that using new technology can be frustrating, so we can answer questions or jump on a quick Zoom call. Our entire staff has an in-depth knowledge of Reach Reporting and can quickly direct you to best practices to improve your reporting.
We are focused on providing solutions that save you time and increase your value. We continue to improve each day and look forward to visiting with you. Your communication with us is vital and appreciated.
Please feel free to chat with us by clicking the help chat bubble in the lower right-hand corner of this page.
Reach out to your Reach Reporting Rep and schedule a Zoom meeting by clicking the meeting link in their email signature.
Or schedule to join our ongoing webinars.
Reach Reporting is dedicated to helping provide a knowledge base that is easy to understand and informative. If you still have questions that have not been answered, please let us know by emailing support@reachreporting.com, chatting with our support team, or calling us at (877) 467-7637. We are here to ensure that you have a positive experience with Reach Reporting, as we want to continue to be the reporting solution you trust.
Need more access to Reach Reporting Resources?
Reach Reporting has a wealth of knowledge and a robust online community to support you as you create reports that provide powerful insight. Please look into the following resources.
Reach Reporting Blog: We add blogs to our site every month to give you great information in a fun and friendly manner.
Case Studies: We interview one company per month to help our clients highlight how they are using Reach Reporting and how it is improving their services and firm offerings. These case studies are invaluable to our community.
Knowledge Center: From simple to complicated, we provide step-by-step guidance to utilize every aspect of Reach Reporting in our robust knowledge center.
Video Tutorials: We know watching is sometimes easier than reading, which is why all of our tutorials are video-based in the video tutorial section of Reach Reporting and Youtube.
Social Networks: Join us on FaceBook, LinkedIn, Youtube, and Twitter.
Monthly Newsletter: Go to the footer of reachreporting.com and sign up to receive the Reach Reporting newsletters delivered directly to your inbox. Our newsletters cover tips and tricks, current events in accounting, strategies to improve your advisory services, and much more.
We look forward to helping you build insightful reports,
The Reach Reporting Team.